Planning first fishing trip of 2018
License and tags have been purchased. It has been a tradition for a few years now. My fishing buddy Pablo and I head out New Years Day to chase steelhead on the Sandy river. As the years go by, my staying out all night New Years Eve has been slowing down making it easier to get out on the water at first light the following morning. Priorities. 🙂
This year I had to stray from tradition due to some prior commitments so I suggested we push out the trip a couple of days. With the high water conditions, this actually might work in our favor as the water comes down and clears up over the next couple of days.
The night before last, I saw a Facebook post from a local fishing guide, Cody Herman of Day One Outdoors, announcing a free fishing opportunity for Veterans hosted by Home with Heroes. There were only enough seats for 4 veterans and their guests. This post was more than 8 hours old so I figured all the available seats were gone. I thought to myself, “I am a veteran :)”. I contacted Cody anyway to see if there was a chance that there was still a seat available. Fingers crossed.
After a few emails and finally a message directly to Home with Heroes, I was notified that I was on the list and could bring one guest. Happy New Year!!!!
Home with Heroes is a non-profit organization committed to bringing veterans and active duty military together and into the outdoors, to honor and thank them for their service.
All the gear is provided and I just need to dress warm and be ready to fish. Easy Peasy 🙂
I invited Pablo as my plus one to make up for my breaking tradition. He gladly accepted. Now, we can both just sit back and enjoy fishing letting someone else drive the boat. Hopefully, I will get some great pics of the day and have more to write about.
Standby…..

That Time Again – 2018 ODFW Angling License
As 2017 comes to an end, I look at the fishing that was and the fishing to come.
My tally last year was not great, but not too bad for mostly fishing a little in July and one week in August.
Personal:
1 wild Chinook
3 hatchery Chinook
3 hatchery Coho
1 hatchery Steelhead
2 Albacore tuna
Boat total:
9 wild Chinook
17 hatchery Chinook
21 hatchery Coho
7 Albacore tuna
This is a far cry from the 200+ fish we landed in August alone back in 2015.
Getting ready to sell the house and keeping the house ready for showings this year has obviously cramped my fishing style. I see now that my priorities were a little out of whack. The house did not sell and I caught few fish. Good thing is I know how to fix this. Fish more. 🙂
It is now time to go out and get my license and tags for the 2018 season. As with all things, the prices have gone up.
On top of the prices going up, the ODFW has been charging us an endorsement fee for fishing the Columbia River and its Tributaries for a few years now. This fee was to go towards getting the gill net fishing off the water because it is a method of fishing that does not target a specific species of fish and has contributed to the decline of our protected fish. Well, special interests got involved and needless to say, the ODFW failed to deliver, gill nets are still on the water and they are still charging us this endorsement fee. I love government. I will leave it at that. I do not want to turn this BLOG into a political soapbox.
The annual license for resident this year is $41.00. If you purchase the endorsement with your license, the endorsement is $9.75. The combined angling tag is $40.50. And one cannot forget the shellfish license at $10.00 for a grand total of $101.25.
Now, as the year progresses, I might add a two-rod validation for specific areas that will allow two rods per angler $24.50 and as my combined angling tag gets filled, I will purchase hatchery tags for $28.50 per 10 fish.
It looks like in 2018, the ODFW will be getting $154.25 from me and because my wife loves fishing more than I do, we can just double that. 🙂
Tight lines and Happy New Year!!!!!!
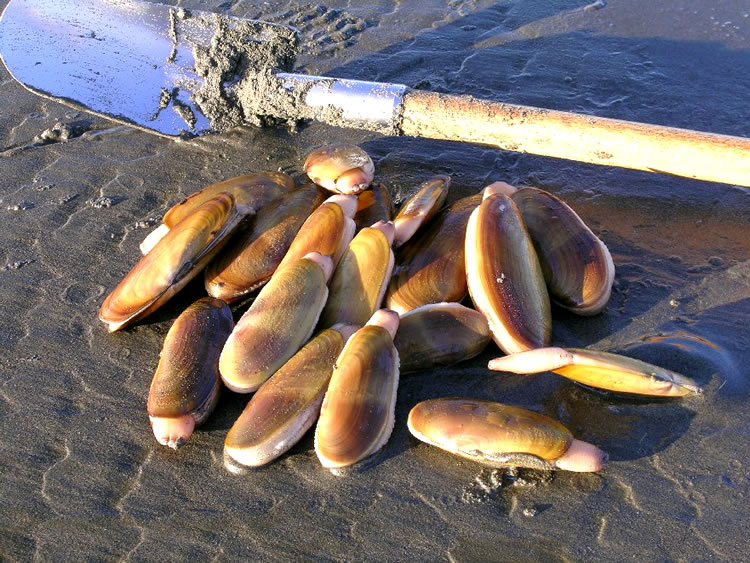
Southwest Washington Razor Clams
Story by: Terry Otto
For the leisurely outdoorsman, winter is a time to stay inside. It’s a time to tie flies, repair waders and read magazines. The fire beckons, and they wait there for spring’s welcome touch. But for the other kind of sportsman, those that love the winter, it is a season filled with an incredible richness of fish and game, even as the number of the people in the woods and on the banks diminishes. Lucky indeed are those hardy souls that venture forth in the steady rain or the freezing wind, for Old Man Winter offers great riches for the soul hardy enough to stand up to his punishment.
In Oregon and Washington the choices for winter adventure are almost endless. It doesn’t matter if you live in the mountains or the valleys, the east side or the west side, along the coast or in the high desert, there is something happening nearby.
The winter nights are long, but they are far more fun when you spend them on the beach chasing razor clams. The southwest Washington coastline has some of the best razor clamming beaches in the northwest, but digging them in the winter is a nocturnal adventure, according to Dan Ayers of the WDFW Region 6 in Monsanto. “In the winter the lowest tides are always at night,” he says, “that’s just the way it works.” The daytime digs won’t happen until spring.
Clammers find razors during low tides by looking for the tell-tale holes they leave in the sand. Once these holes are spotted, you have to dig fast, either with a shovel or a clamming tube, to reach the speedy clams before they escape. Since the winter digs happen at night a lantern or flashlight must be used. “I’ve had the best luck with the old-style white-gas type lanterns,” says Ayers, but every veteran clammer has his own favorite.
This is a great family adventure and even the kids can learn to spot the signs of clams. Of course, caution is needed when on the beach at night. “Don’t turn your back on the surf!” warns Ayers. Often the weather is too rough, but that just leaves more clams for the next low tide.
There are four major razor clam beaches in Washington, but the southernmost, Long Beach, is the most popular. The Oysterville approach is a great place to access the beach.
Other razor clam beaches are Twin Harbors, Copalis, Mocrocks and Kalaloch.
The limit is 15 razors, the first dug, no matter the size.
For more information, check the WDFW Web site

What To Do With All Those Gift Cards
I hope everyone is having a wonderful Christmas holiday.
For many of us, it is time to decide where to spend all those gift cards. I have a few suggestions of products I have been using or wanting to use for some time now.
The first product I have had my eye on for a while now is the Yetti Hopper. I personally have not purchased one yet because of the cost, but with gift cards, that may no longer be an issue. Yetti has a large selection of gear to keep whatever you want cool or warm like with their Rambler.
The next featured product I use all the time is the Boomerang Braid Cutter. This tool cuts right through my braided line without hesitation. It comes on a retractable lanyard which keeps it handy and out of the way. I never fish without it.
This is another cool to have. The Avet Reels are machined from billet aluminum and anodized in many colors. For Tuna fishing, the lever drag is a must, but these reels are not exclusive to tuna. They make great salmon reels as well. I bought mine last year and love it.
I have one of these in my truck and one in my toolbox. This multi-tool has bailed me out numerous times. This is a great gift for yourself or anyone that tends to be a little handy. 🙂
If you just do not know what you want to spend those gift cards on, feel free to use the amazon link here and search for whatever you desire. Using our links will help us get recognized and established with our affiliate retailers. Your support is much appreciated. Thank you.
HAPPY NEW YEAR!!!!
What am I doing when I am not fishing? I am thinking about fishing.
A lot of what I have learned about fishing comes from watching professionals like Cody Herman with Day One Outdoors.
This post from Cody’s Day One Outdoors blog has taught me the basics of making my own spinners. To my surprise, some of my spinners have actually caught fish. 🙂
I would like to get this information out there to my followers so you too can start making your own custom spinners and catching more fish.
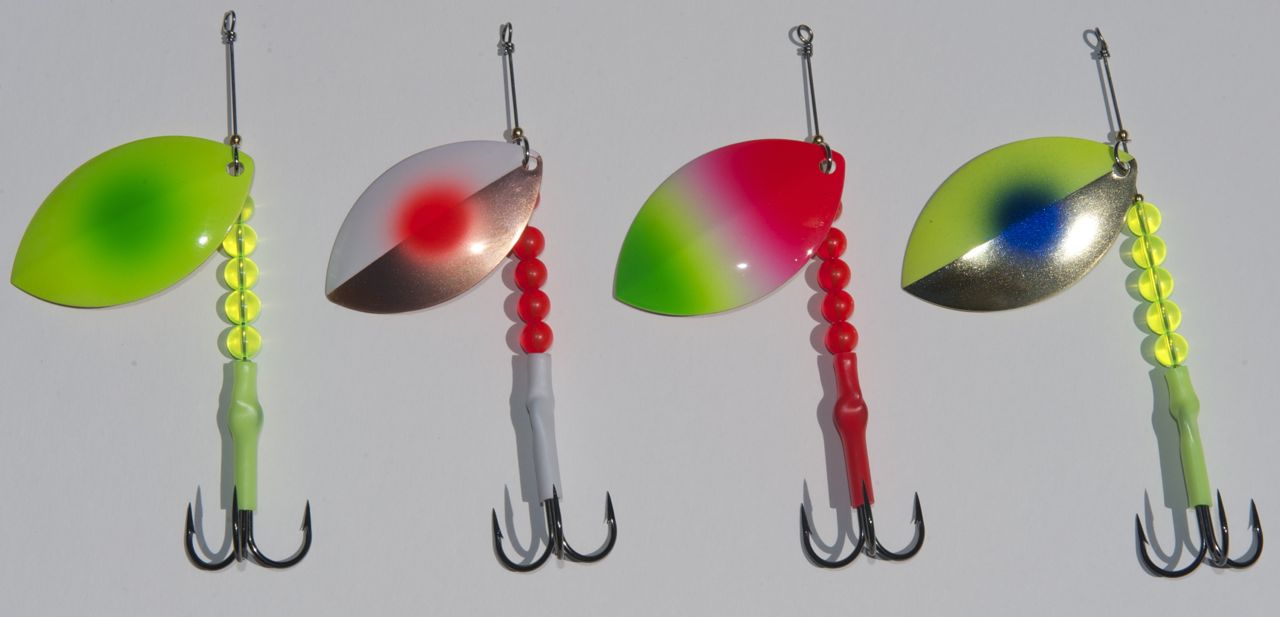
Salmon Spinner Making 101
Parts:
.030 – .040 wire
10 or 20 Treble Hooks
8mm round plastic beads
6mm round plastic beads
Metal Bearing bead
4 Clevis
5, 6 or 7 Cascade Blade
Colored Tubing
Tools:
1 Pair of Needle Nose Pliers
Fishing for salmon takes on many forms. From utilizing bait to hardware, an angler has a multitude of options to target salmon and generate the flight or fight reaction that comes in the form of a bite. As anglers, we strive for that moment.
Spinners are a fantastic lure to use to target spring and fall salmon alike. From trolling to sitting on anchor and casting, spinners give off a powerful vibration that Salmon find hard to resist.
As you will hear me say in all of my blogs as well as on Outdoor GPS TV, you must follow three rules to catch fish.
1) Location: We all know the saying 10 of the fishermen catch 90 of the fishthat is because 90 of the fish are in 10 of the water. If you are not in the fish, you will never be able to illicit a bite.
2) Presentation: Determining if the fish wants a fast moving bait, hardware trolled, backbounced eggs, on anchor stagnant presentation or anything in-between is important. If you are downhill trolling, and dont get bit but the anchor boats are, change your presentation. This also includes lure choice. A herring, Spinner, Kwikfish and eggs all give off different vibrations and looks for the fish. Listen to what they want.
3) ColorScents: Once the first two steps have been dialed in, then you can begin to change colors and add scents. My opinion is that changing anything from your original plan at the beginning of the day is pointless unless the first two steps have been answered.
Now, back to building spinners

This first picture shows a general box of pieces you will need to start building a spinner. Start with a piece of .030-.040 sized wire in a 10-inch section. Needle nose pliers will be used to bend the wire.

Choose a spinner blade in Size 6 to 7 Cascade and a 4 clevis for this type of trollinganchor spinner. Next select 4 8mm beads, one 6mm bead and a metal bearing bead in the color combination of your choice.

First, use your needle nose pliers to make a 45-degree bend away from the centerline of the wire. Grip the bended piece of wire with the pliers and curl the tag end of the wire around the pliers themselves to create a circle. Next place the Tubing color of your choice over the shank of the hook. Then put the hook inside the looped wire that you have just created. Pinch the loop with your pliers and grab the tag end of wire with your other hand to twist the wire around the main wire. Trim the wire so it is flush with the main shaft. Make sure that your loop is PERFECTLY inline with the main shaft. This will ensure that your spinner does not wobble and spins straight.

Next, pull the tubing above the hook up onto the wire shaft just above your wraps. If the tubing is difficult to move, warm and soften the tubing by placing it under hot water. Once the tubing is up above the wrapped wire, position the loop in the wire and the loop in hook in an offset manner. This too will assist in the proper spinning of your lure.

Now place first the 4 8mm beads, then the 6mm bead and finally the metal bearing bead onto the main wire shaft from the un-looped end. The metal bearing bead is key to reducing friction and will last several seasons without breaking or grinding down, unlike a plastic bearing bead.

Next put the 4 clevis through your spinner blade and thread the wire through the clevis. Your spinner is now just about complete.

To finish building the spinner, you will need to make another loop in the wire at the top. This is an important part of finishing up your lure. I personally leave a long piece of wire above the clevis. I want the blade of the spinner to be roughly in the middle of the completed wire shaft. This decision is based upon physics. The blades centrifugal force on the wire is constantly trying to throw lure into a wobble. By leaving a long tag end at the top and having the blade in the middle of the shaft in addition to the drag of the spinner working in the current, your spinner will spin more free and not wobble.

Make the same loop now at the top of the spinner and you have finished a fish catching machine! Finally, look down the centerline of the spinner and make sure it is perfectly straight. Now go stick some fish!
This How-To is strictly 101. I will be placing more educational posts in the future regarding colors, rigging, presentations and patterns for spinner fishing over the next few months. Feel free to leave your questions and comments below! Thanks for reading!
– Cody Herman
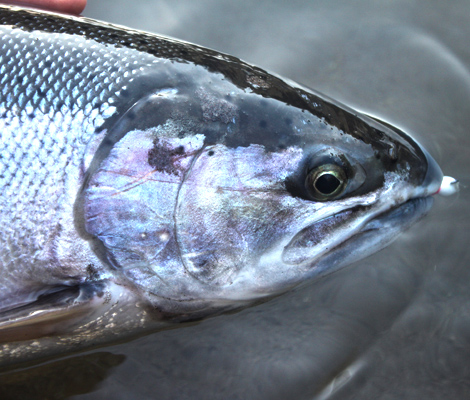
First Winter Steelhead on the Incredible Sandy River
The Sandy river is not my back yard exactly. From where I live, it is more like my neighbor’s back yard down the street. None the less, it is a river I fish quite often during the late fall and winter months when I am not fishing the Columbia river or Pacific Ocean.
Chinook, Coho and Steelhead all make their way up this river system at different times of the year. Knowing when the fish are in the system and when best to target which species, I have learned from experience.
I am fortunate to know a couple people that I enjoy fishing with that have drift boats, pontoons and rafts for different water conditions. Not just any drift boats by the way, a couple of Pavati drift boats. The side doors in the Pavati’s get more appealing the older I get. 🙂
If it were not for the holiday weekend coming up, I would be planning a float with my friends instead of writing about one.
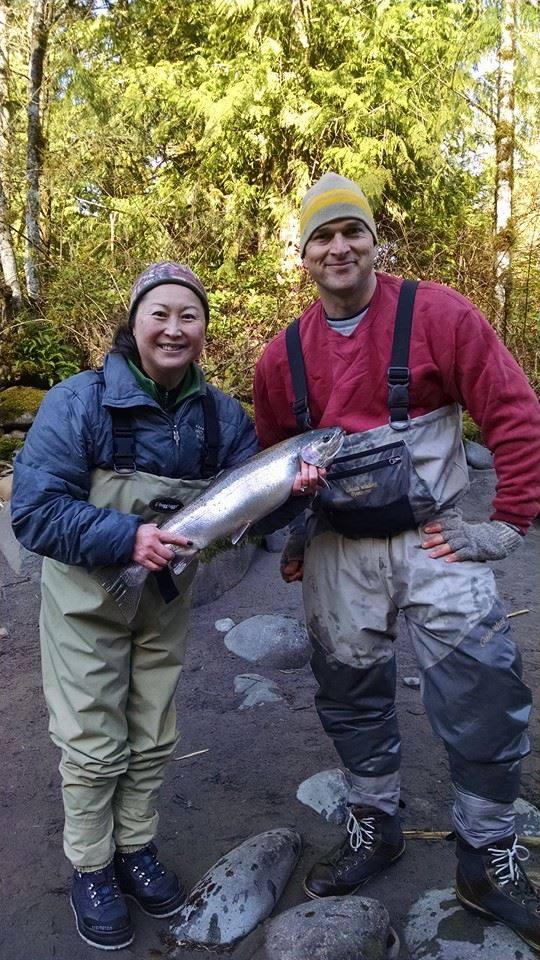
It was a couple of years ago. I took my wife out with us to chase winter steelhead. This was her first float on the Sandy river. She loves to fish almost more than I do and she has all the gear. Waders, Boots, Gloves, Spinning rod, Bait caster, and a backpack full of the necessities for fishing winter Steelhead. We launched at first light. It was probably at or below freezing. This is when the right gear makes all the difference to keep warm. We hit a few holes on the way down with not even a nibble. It was shaping up to be a nice boat ride. One particular hole we stopped to fish, there is a good sized rock protruding out of the water along the bank. My buddy got my wife up on the rock to give her a vantage point to cast to the seam we were targeting. After a few minutes, she had not gotten a bite and decided to get down off the rock. She slipped and went face first into the water. It was not as bad as it sounded, but she did take some water down the front of her waders. Needless to say, she was pretty cold after that, even with the right gear. Being the trooper she is, she wanted to continue fishing. The very next cast it was bobber down. The adrenaline hit and being cold was no longer a factor. It gave her an incredible fight and she eventually brought it to the bank. This was her reward for never giving up. I love that woman.
Step 3 – Award Winning Fish Alaska Challenge Smoked Salmon Recipe
This is part three of a three part post. Be sure to continue to the other posts for the full process.
Continued from yesterday……
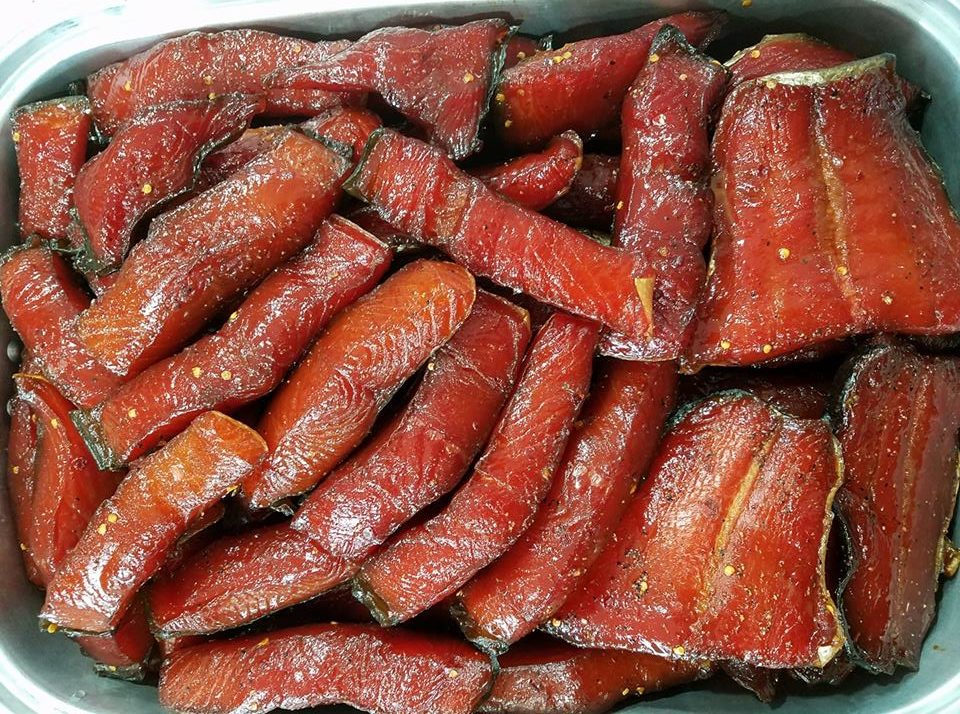
This part of the process takes the most time. Be ready for a long day to monitor the smoking process and adjust as needed.
I pull the fish out of the brine, drain and put on racks to dry for an hour or so. I do not rinse the meat like some others do. Let dry long enough for the liquid to start to form a glaze on the top.
You don’t need high heat. 110-130 is perfect if you are using a smokehouse or smoker that you can regulate the temp. I use a traeger and the average smoke temp is about 150. For me, it is perfect for a set it and forget it setup. I have not had any complaints. 🙂 Smoke for a minimum of 6-8 hours, but time can vary quite a bit depending on outside temps. During the colder winter months, I have to wrap an insulated blanket around my traeger to keep it from getting too cold on smoke mode and shutting off. There is a learning curve in determining when it is done as the fish is moist and not dry. It will usually bubble some fat up and get flaky. I know by touch. I try to put like thickness pieces together so I can take individual racks out when they are done and leave the others. I use hickory pellets in my traeger and the flavor is pretty tasty. You can use any flavor wood of your choice.

When done, remove from the smoker and let rest. At this point, it is extremely difficult for me to resist snacking. 🙂
I put the finished product in a container and refrigerate over night before vac-u-sealing and freezing.
Step 2 – Award Winning Fish Alaska Challenge Smoked Salmon Recipe
This is part two of a three part post. Be sure to continue to the other posts for the full process.
Continued from yesterday……
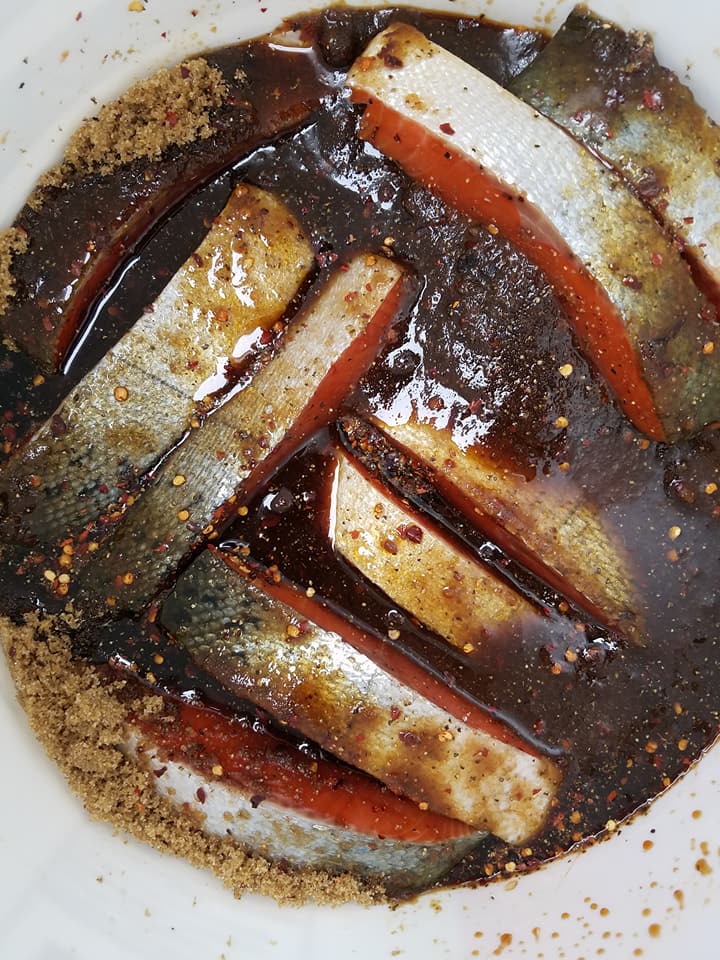
Now, the salmon has been thawed, de-boned and sliced, it is time for the brine. Again, this recipe can be found with a simple Google search.
This is the recipe that won the Fish Alaska Challenge a few years ago. It was judged amongst several hundred entries and won by a mile.
Here is the dry brine.
7 Cups of brown sugar
2 Cups of salt (non-Iodized)
¼ Cup course black pepper
¼ Cup crushed red pepper – I bumped this up to 1/2 cup for a little extra kick
¼ Cup garlic salt

Yoshida’s original
Thoroughly mix the dry rub in a big bowl. Use a separate waterproof container with a lid to brine the salmon. One that you can turn over and upside down. I use a five gallon bucket but it can be smaller. Start layering the fish. First layer is skin down and flesh up. Liberally (I use about two cups between layers) spread a layer of dry brine over the flesh side then lay another layer of fish on top of the dry brine but place this layer flesh down or flesh against flesh. Continue to layer skin to skin and flesh to flesh. You only need to use the dry brine between the flesh sides. Continue till finished, then add 2 cups of Yoshida’s sauce to the top of the bucket and close. If you can keep in a frig great… if not, its ok. I leave it in the garage or outside if it is colder out but not in heat. Turn the bucket upside down every couple hours as liquid forms. I’ll let soak for 18-24 hours. I think I like to soak 24 or even a little more if the fish is borderline thicker.
Continue to Step 3 post……..
Step 1 – Award Winning Fish Alaska Challenge Smoked Salmon Recipe
This is part one of a three part post. Be sure to continue to the other posts for the full process.
I am about to reveal my newly discovered super secret smoked salmon recipe.
Well, it is not that secret. A simple Google search for ‘Award Winning Alaska Smoked Salmon’ will expose the recipe. It was actually shown to me by my friend Jason. The secret part is how I tweaked it to my preference and what I use to smoke it.
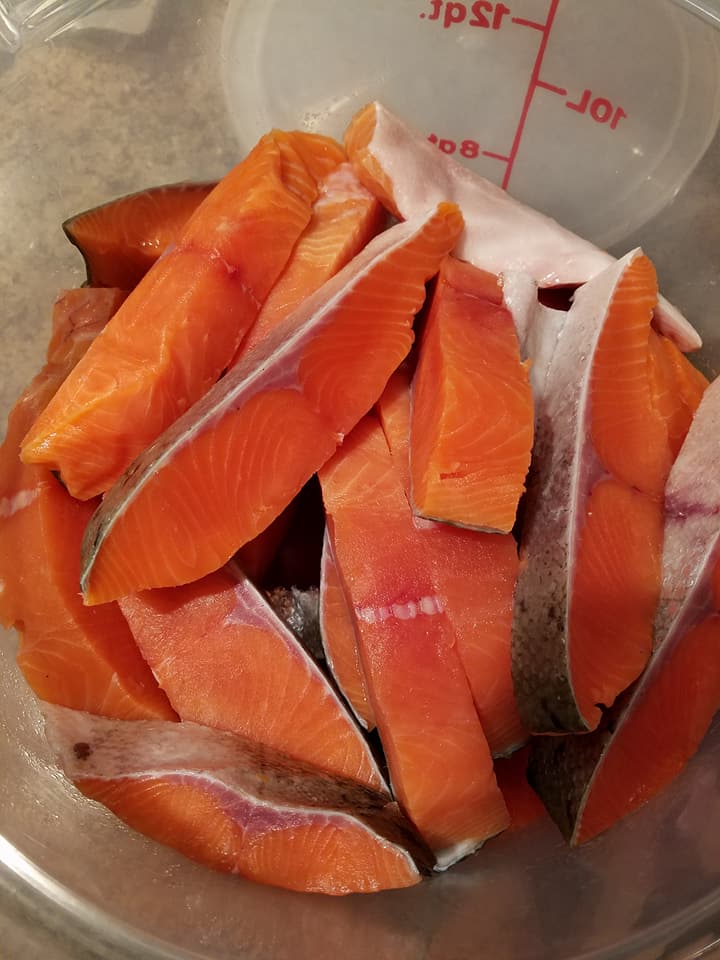
This is a several day process and I will walk you through it one day at a time. Step 1 is the meat selection, thaw, de-bone and slice to prep for brine.
I prefer Chinook (King) salmon when I smoke it. The oil rich meat makes for a super moist finished product as compared to the other species of salmon I have tried. Spring Chinook is the holy grail of smoked salmon in my opinion. The oil content is so high, it is just dripping with oil when I pull it out of the smoker. At first, I refused to smoke spring Chinook because it seemed like such a waste to not just cook it up and eat it. I have since been enlightened.
I always de-bone all of my filets when preparing to smoke. I have found it easier to pull the pin bones after the meat has been frozen, so I will almost always freeze the salmon first. I have a pair of kitchen needle nose pliers that are my tool of choice when pulling the pin bones. It takes a little practice to squeeze just hard enough to pull the bone without pinching it off. I am still practicing. 🙂

Now it is time to slice the filet into strips. Because the Chinook usually tends to be extremely thick across the back, I cut it into 1″ slices to get the right brine/smoke to meat ratio. If you cut it too thick, it starts to get more like cooked salmon than smoked and if you cut it too thin, it gets more like jerky.
Continue to Step 2 post……..

3 Peaks Public House & Taproom
I want to give a shout out to 3 Peaks and their neighboring fish market up in Ridgefield. What makes this place stand out to me besides the great selection of beer is the fish market next door that you can order food from and they will deliver right to your table at the Public House. Pacific Northwest Best Fish Co. is the name of the fish market. They are a family owned retail store, smokehouse and cafe and they serve some of the better panko breaded fish and chips I have had. The other food on their menu looks divine, but I have not ventured from the fish and chips just yet.
If you find yourself in the area and have time to stop in for a beer and a bite, I would recommend these places.
Currently, I just stop in on occasion when I am up in Ridgefield, but once I become a permanent resident, I think this place will become my local watering hole.